Saturday, February 22, 2014
Hardware How I Want It
I would pace my time building a piece. Draw out measured drawings and try to faithfully execute them by saw and chisel. When the build was over I turned into a fool who felt like whatever finish and hardware I could slap on as quickly as possible would only help me get to building the next thing. Then I started to look at my work with a more critical eye and tried to discern why my pieces seemed to fall short of my expectations. The process yielded several things I have tried to spend several years fixing. From stock selection to my finishing choices I tried to educate myself and better my processes. I think, for the most part, Ive gotten better.
The continual struggle is hardware. In fact I think I would drive a long ways to attend a class taught on hardware alone. I think the important thing Ive figured out is that you dont have to accept your hardware as it is when you buy it. It is amazing what you can do with a hacksaw, a couple files, and a ball pein hammer.
I didnt have to do any major modifications to the hardware I used building a version of the School Box from "The Joiner and Cabinet Maker" but I did have to do some work dressing it up. I had several sets of uneven strap hinges from Lee Valley sitting in the shop and my plan was always to use a set of them on this build. As I opened the packages I found them covered in a brown, manufactured rust that I just thought was unappealing.
.JPG)
So I put some honing oil on them and went after them with some 320 wet/dry sandpaper
.JPG)
When you start this process youre never sure quite what youre going to uncover. The first two I cleaned didnt match up very well but fortunately I had bought four sets together, so I went ahead and cleaned them all up. I matched them into pairs and chose one set for this project.
.JPG)
If there is one thing I wish I had never learned about, it would be timing screws. It was something I had never noticed before I learned what it was. Now I look for it everywhere. It feels like Ive been infected with a horrible OCD virus for which there is no treatment.
If you dont know, here let me infect you as well, just like Chris Schwarz did to me. Timing is clocking all of your screws to line up the same. It takes a bit of time and care to accomplish, but I cannot stop myself. My oldest daughter asked me why I was worrying about it and I explained that, in my mind and eyes at least, if a craftsman has gone to the length of detail needed to time the screws on the hardware, then that is a sign that every other aspect of the piece has see the same quality attention to detail.
Im worried I might have infected her too.
Take two flathead screws and a countersink bit and call me in the morning.
.JPG)
I always struggle with hardware installs. Maybe I dont know enough of the tricks yet but it always seems to take a good amount of trial and error to get things placed right. Perseverance is the key though and eventually I do win.
It is a bit frustrating though to put on all the hardware, then take it off for finishing, then put it back on again. Then again, maybe Im doing it wrong.
.JPG)
With the lid on all I had left to do was make a walnut wrap for it to match the skirt.
.JPG)
The lid wrap is easier to fit than the skirt because it only covers three sides. I chose to mirror the bead on the bottom of the skirt on the top of the wrap and just ease the edges of the bottom. Some glue and nails and I was there.
.JPG)
I installed a stay chain, (timing the screws that hold it in place of course) and the box was ready for finishing. I wanted to put handles on the sides and I had a set of chest handles sitting in my stash I though I would use but after getting to this point I decided I didnt like them as much so I held off until I make another online hardware order, then Ill install them.
Ratione et Passionis
Oldwolf

Cold rainy Saturday afternoon in the wood shop
Well, its been raining and its gotten colder today-Im hoping tomorrow wont be cold or rainy or at least just dry.
I made the new work table and it came out just fine:

I used Simpson Strongtie construction brackets to make it and it only takes a couple of hours to cut all the lumber and assemble it. You can see the plans for this on their website at: http://www.strongtie.com/DIY/projects.html. I really needed the table space and Im glad I made this.
I got up early this morning and I ran over to Home Depot to get a 2x4 and the second I walked in the store I could hear lots of children laughing and talking and lots of little hammers hammering away. I walked over to see what was going on and the store was hosting a wood working class for youngsters and their parents.
It was wonderful to see this. Im always glad to see kids working with wood, learning to use tools, and using both their heads and their hands to understand a problem and to work out a solution. Bravo to Home Depot for doing this.
Next week we begin the coffee table for my son so stay tuned as the process photos for that will appear on my other blog site, www.piperooo.blogspot.com.
Well, Im cold and wet and so Im going to finish up in the wood shop and go bake an apple pie for Easter dinner tomorrow. I hope you all have a good rest of the weekend.
VW
Unique Garden Ideas Decorating
Teacup Crafts & Home Decor

Inspire Bohemia: Unique Garden Planters and Displays
Unique Garden Planters and

Friday, February 21, 2014
Stair Saw to Heaven

Further progress on the stair saw or dado saw. Again, thank you to the Norse Woodsmith Blog for turning me on to this saw. The interesting step to me was cutting the teeth of the saw from scratch, Of course I had no true idea how to start this, and thus experimentation ensued. First, I clamped the five inch stretch of saw blade steel into the saw vise, (a section of steel pillaged from the carcass of a cheep box store backsaw) I started by just trying to drag the triangle file across the edge, but I found it difficult to keep the file in a straight line and gain any progress. I gave up quick because I did not want to wear down one section disproportionally.There was better ways to do this than to eat up a whole file.

I knew there had to be an easier way to do this, and I knew it was sitting right there on the bench, staring at me like the wiggly eyed pile of money that works for a living in those Geico adds. The angle grinder I used to rive a once complete saw blade into the sections needed to make a wide blade bow saw and this stair saw. Well, I figured, what the hell have I got to lose? Plugged it in, fired it up, and cut a series of “U” shaped groves, maybe little more than 1/16th of an inch deep. In a matter of a minute, there was sweet satisfaction. Then I went to work with the file again, reshaping the U shapes into satisfying saw V’s with a 20* rake and fleam.
From there I went to work on the handle, actually, I went to work twice. The first attempt just didn’t work. While attempting to saw away some of the larger sections of waste I miss-cut and left a space about ¾ inch between the down cut and the side cut. Not feeling intelligent at that moment in time, I chose to try and grab a chisel and chop through the space. All I did was wedge it and create a crack that ran across the front push knob and split the section free. Still feeling stupid I decided to try and repair the mess by drilling for a couple of dowels and trying a glue up, of course it didn’t work. I thought for a few seconds, decided to set my frugality to one side, and re-cut a new section of poplar for a new blank.

The grain on the next section was much better anyhow, I was much happier. I traced out the pattern that I printed off the web and modified to my grip, using the open grip saw handle I finished a few weeks ago as a judge for my hand. Then I went to work with the coping saw. After the shape was released from the wood, I spent the next few hours shaping it with a series of rasps, scrapers, and some sandpaper. I have to say that work was very satisfying, different from the majority of work you do as a general woodwright.
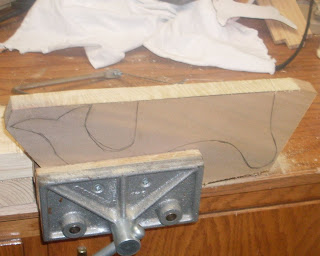


After cutting the saw kerf to accept the new saw blade I called it a night, I don’t have any more rivets right now to set the blade tonight, and I’m thinking of finding an alternative to the permanent rivets for a few reasons. First, the rivets were never the perfect answer; I managed to crack 2 out of 3 handles, no significant problems or worries, but not an outcome I want to repeat. Especially, after my first escapade with this handle tonight. Second, I am not sure of the depth I have chosen with this blade. Most of the time I will be cutting dado’s 3/8 inch deep, so setting the blade at that depth was tempting, But I didn’t want to take away the ability to cut deeper. Right now, the depth I stopped at leaves just a bit more than a 1/2 inch of blade exposed, I can see the possibility of setting two depths, one at 3/8 and one deeper, and being able to adjust between them by resetting the saw nuts. That way I can bottom out the saw and know I have the same depth on both sides of a dado. I really like this idea, makes me think if there is a design possible to make a sliding dovetail saw . . . hmmmm . . . I’ll have to think a while on that one.

Inca Tools Woodworking Woodworking Plans

Inca Tools Woodworking
Woodworking Plans
Do-it-Yourself Patterns and Crafts, Woodworking kits, Furniture Plans Plus Much, Much More. Will Show You How to Make 16,000 Different Woodworking Plans. Use The Plans For Fun, Functionality or Profit!
Inca Tools Woodworking. Wood is one of the most lovely, tough and versatile supplies that you can operate with whilst on a do it your self project. The beauty of a cabinet door that is completed in wood cannot be matched by any other material whether or not natural or man produced. As with any project, you would require a detailed set of plans whilst you work with wood and wood based components. This is why it is recommended that you use a detailed set of woodworking plans as soon as you program to extensively use wood based materials to comprehensive the project that you have embarked on.
Now let us examine why woodworking plans are important in any wood primarily based do it oneself project. To begin with, these plans aid you remove waste. If you begin a woodworking project without having a firm plan, the probabilities are that you would end up utilizing far more wood that you initially intended to. Most of the wood based projects would call for comprehensive assemblies and sub assemblies.
When you begin your project, you would be ideally operating with individual members of wood and finishing them individually prior to assembling them. If you do not have the correct woodwork plans, you could finish up with mismatching wood members at the time of assembly. This could result in high priced expense and time overruns in the project. All these difficulties can be avoided by utilizing a effectively laid out set of wood plans.
The other advantage that you could have if you use woodworking plans are that you would be prepared with all the tools and implements that you would need for finishing the wood primarily based project. Often we come across that we do not have access to a distinct tool in the middle of a woodworking project. This circumstance could lead to a loss of time and at times you may perhaps even have to abandon the project in case a particular tool is not obtainable. All these problems can be avoided if you have a detailed strategy at the onset. Inca Tools Woodworking

Inca Tools Woodworking Information
Consistent Advertising - The romance of woodworking will have to have to be balanced with the constant advertising and advertising vital to retain the operate coming in. In time, phrase of mouth brings in a lot of operate if you develop a good popularity. Until lastly then, you will will need to get the phrase out routinely. After the work arrives in you have to have excellent manufacturing systems so you can complete the tasks promptly and continue to preserve the cash flowing. If jobs think about also incredibly long and the dollars movement stops, it can turn into tricky to shell out the expenditures. Speaking of revenue flow, you must construct and adhere to regular assortment approaches. This is 1 area exactly where by numerous woodworkers fail. The payment for the execute will have to have to be as important as the carry out by itself. If you are lax in accumulating, you will run into prospects who fall quick to shell out you and this will bring about truly severe income movement issues.The Smaller enterprise - Even even so you like woodworking, you will want to do the household company if you are to make a dwelling at it. Superior benefits generally requires an in-depth information of each woodworking and business enterprise management. If you never have every, I recommend you hesitate to leap in until you have honed your enterprise skills.
Seeking back once again I recognize that my lack of information in the course of my startup rather a handful of decades back could have been offset with some typical facts and a further individual to advise me.Sadly I had to find out most elements by trial and error.
Just about every single and every and each week, I take the time to go by means of the comments that my viewers make about my woodworking internet site. 1st of all I want to them for taking the time to comment, I surely value all of the comments and suggestions. This preceding week there was a comment from a gentleman, who expressed a require to get into woodworking. As a man who is passionate about woodworking, I want to welcome him to the fold. And I want to give you him all of the suggestions and encouragement probable in his endeavors.Inca Tools Woodworking
Inca Tools Woodworking :
Tag : How About Inca Tools Woodworking, How To Get Rid Off Inca Tools Woodworking, Best Reviews Of Inca Tools Woodworking, How To I Get Inca Tools Woodworking, Where Can I Buy Inca Tools Woodworking.
Taking the Till To School
Ive been making lots of boxes lately, most of them carved, bible box style boxes. But I havent fit a till in one for a while. I had to look back to find the last one I built, it was for the Medieval Style Hutch Chest I built a little over two years ago.

That one had a lid, fixed with pin hinges. This time I was forgoing the lid. But I still had to make the stopped dados for the till.
Like everything, it starts with the layout.

First I measured and penciled in for the 1/2" dados. There is no secret or magic to the layout, I played with a couple 1/2" wide pieces of scrap until the spacing felt right.

I have been getting to like laying things out with a marking knife more and more. I started using them because I had read many woodworkers I respect write about how wonderful and accurate they were, but it was a tougher sell for me. I would start using the knife and before too long in a project, I would switch back to my trusty mechanical pencil.
I am up to about 60% knife and maybe 40% pencil. I still like to scribble in my waste area so the pencil is always near anyway.
.JPG)
.JPG)

.JPG)
.JPG)

Everything ripped and fit to size.
.JPG)
A while back I started writing on my work, but not like you think. I started writing in places that no one can see. I write on the inside faces of joinery, behind moldings, and in other odd places. Thos. Moser got me started after I read a passage in his book about him doing the same thing. I wrote about the idea HERE. Its putting just a little more of myself into the work. This piece, being for my daughter was no exception. I took the chance to write a whole letter on the bottom of the till, on the underside. I also wrote in the rabbet.

Once the dovetails are glued up with the till wall and bottom sandwiched in place . . .

. . . and the bottom is nailed on. No one will see those words until the piece falls apart. That should be a long time from now. But Chloe knows its there, in fact she asked me about it. "Did you write something inside this one Dad?"
You bet I did.
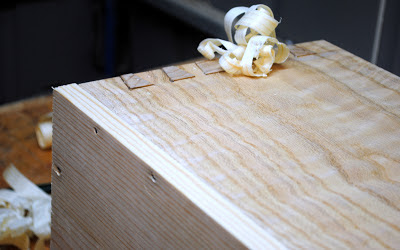
With the pine bottom nailed in place it was just a matter of planing it and the proud parts of the dovetails down flush with the sides.
Ratione et Passionis
Oldwolf
Thursday, February 20, 2014
Woodworking for Beginners
I’ve been woodworking on and off for over thirty years and I still have questions that need an answer. There are untold numbers of people who don’t know how to read a tape measure don’t know what a speed square is or how to use a level. Those people aren’t dumb they just haven’t learned that skill yet. If you’re around a person who makes fun of you or puts you down for what you don’t know then they are the dumb ones.
If you have questions you want answered then leave a comment. If I don’t know the answer then I’ll find it or a source that has it. If you need to know how to read a tape or what ever else I’ll write a post and explain it to you. This is the mind set I think woodworking for beginners should start.
I know you are ready to start building. I suggest you start off with easy woodworking projects. Maybe a birdhouse or a bat house just to get your feet wet. Starting a woodworking project that is above your skill level can cause you to give up on what will be very rewarding in time.
To make woodworking easier and less frustrating there are certain items that will aid you. You don’t have to have the very best but you do need the right tools to build a good project. You need a good instructional product that has detailed blueprints, videos and step by step instructions for you to follow. It may not make since to you to have a blueprint for a birdhouse but good product will give you a material list, suggest the tools you will need and the print lays it out in detail.
It’s usually not the big things that cause you to have problems with a project. It’s the little details that you miss that become so frustrating to try and fix. I hope this post gave you information you can use as you start woodworking. If you would like to look at some woodworking projects to start off with click here
